We're an affiliate
I hope you love what I recommend! Just so you know, I may collect a share of sales or other compensation from the links on this page at no extra cost to you. Thank you if you use my links, I really appreciate it!
Hi guys! Happy Star Wars Day a.k.a. May the Fourth Be With You! I hope you have an amazing day filled with Star Wars adventures (movies, books, and series). To celebrate this day, I wanted to make some crafts at home with supplies that I had at hand. I also used a bunch of recyclable supplies like water bottles and cardboard/cardstock from the packaging. All of them are stationery related though they can also be used for other purposes. Make sure to let me know down below how are you planning to celebrate this day. I hope you enjoy all of these Star Wars Stationery DIYs.
Star Wars Postcard
The first thing I did was a Star Wars-themed postcard with a pocket on the right side to hold another of the DIYs I will be mentioning going forward. It is a 5” x 7” card with the addition of the pocket. I will make sure to put the measurements and the folding and gluing placement in the picture.

Decoration
To decorate the card I used watercolors, gel pens, and Crayola super tip markers for lettering and calligraphy. I also used my pencil to sketch the cover. As you can see, I doodled a half Darth Vader and half Death Star on the coven with watercolors on the background sharpening up the division. With the markers, I did the lettering for the quotes from Anakin Skywalker and Padme Amidala. This is a really easy and cute idea to give to your Star War fanatic friends.

Star Wars Tracker Journal

You guys know how much I love stationery so every time I find a new excuse to create a new journal and such. I don’t like to throw away stuff and had a bunch of paper strips and cereal box cardstock saved up for this type of occasion in which I will find them useful. I used the tutorial from Sea Lemon to do the stitching of the pages and used a thick ribbon for the spine of the text block. For the extra detailing like lining the end of the pages and such, I used my cutting tool and mat (you can skip these things but if you aren’t please be very careful).
I plan to use this journal to track the things that I have watched from the whole Star Wars universe. I recently watched The Mandalorian on Disney Plus and loved it. If you plan on making this a gift, I recommend you fill it out with episode trackers to give to your friends and maybe plan on watching a series together or something like that.
Baby Yoda Pencil or Cosmetic Bag
As I said, I loved The Mandalorian and a big part of that was Baby Yoda. Recently one of my pencil bags broke (I don’t know if it had to do with the fact that I filled it too much…). I had a bunch of zippers from a sale in which you could get 5 zippers for 50 cents which I couldn’t let go off so I decided to put them to good use and made this simple pouch.

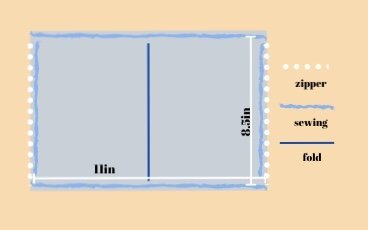
I used a sheet of felt fabric, acrylic paints, paintbrushes, a sewing kit, and a zipper to make this pouch. I will make sure to leave the measurements, sewing, and folding lines. Also, I sewed the zipper on top of the fabric to hide the fabric’s rough edges.

Then, I used the back of the paintbrushes to paint by dots on the pouch. I doodled Baby Yoda and painted blue and purple dots everywhere.
Note: I first sewed the zipper and turned the fabric inside out to sew the sides and turned it outside in once again to get the finished product.
Stationery or Jewelry Organizer

This DIY is the “complicated one” you could say as it takes a bit more time than the previous ones.
Materials
- 3 Water Bottles
- Cutting Tool
- Cutting Mat
- Cardstock or Cardboard from any Packaging
- Acrylic Paint
- Paint Brushes
- Ribbon
- Permanent Markers (Sharpies)
- UHU Glue
Process
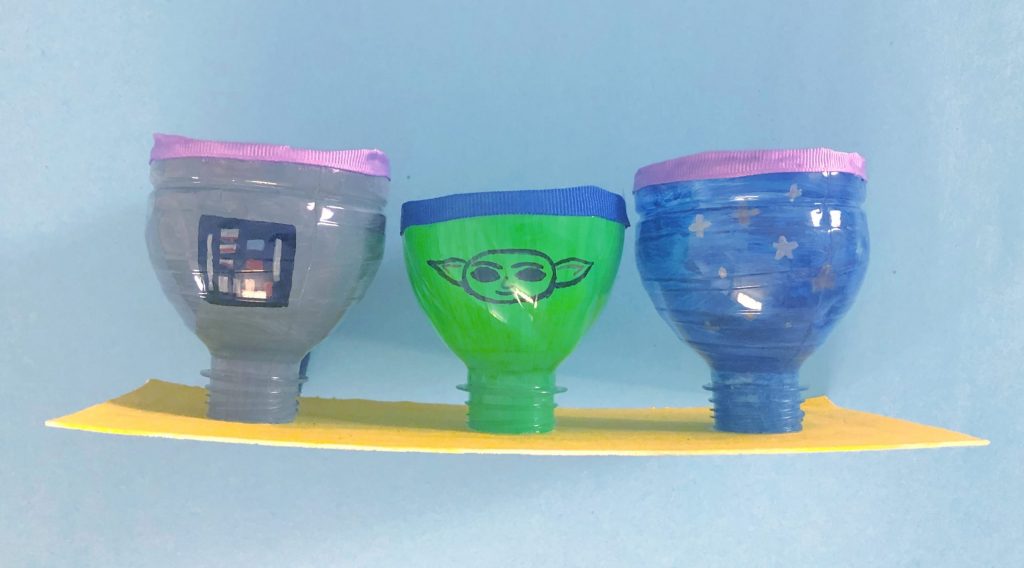
- The first thing you want to do is cut the top part of the bottle. Most water bottles have a line on the top. I used and cutting tool though you could do with a scissor.
- After that, I painted the insides of the bottles: one in gray, one in green and one in blue with a touch of lilac and fushia. I had to do about 3-4 coats on each of them.
- Once the paint dries, use a colored ribbon of your choice and fold it on the top so that you don’t have to make contact with the rough edges of the plastic. I used UHU to glue it and binder clips to hold it together.
- Then, I used permanent markers to doodle on the front part I was going to use for the organizer. I doodled the control center part of Darth Vader’s suit, Baby Yoda, and stars with the metallic markers.
- Lastly, I glued the mouth of the bottles to the piece of cardstock I had previously painted.
If you have questions about any of these DIYs make sure to let me know in the comments section down below.
I hope you enjoyed this extra piece of content for this week. If you are interested in more content like this, make sure to subscribe to my weekly newsletter and check out my social media. I hope you had a lovely Star Wars Day and enjoyed these Star Wars Stationery DIYs. “May the force be with you.”
Be Yourself, Be Happy, Be Human.
Lots of Love, Patrick.

